RSIG3D Local/Remote CMAQ File Reader
RSIG3D now supports importing CMAQ data directly from files on local disk or on a remote system, such as EPA’s Atmos high-performance computing system (EPA users only). This new capability allows RSIG3D users to view CMAQ data that is not already available in RSIG’s data archive.
If this is your first time using this capability, it is advisable to start with the local option, as it is simpler. The remote option requires additional setup steps described below.
The instructions on this page assume the user is already familiar with using RSIG3D to access and view CMAQ data. New users should first review the RSIG3D tutorial and become acquainted with the RSIG3D user interface before proceeding.
On this page:
Reading a Local CMAQ File
- Download and unzip the CMAQ test data files for RSIG3D (zip) (380 MB).
- In the RSIG3D Data tab, set the date to
07/01/2017, which corresponds to the date of the CMAQ test data.
Note: You can optionally define a bounding box within the continental U.S. as usual. It is important to have the date set correctly, because the CMAQ file will be subjected to the same subsetting criteria as any other data in RSIG (i.e., subsetting by time, bounding box, variable, aggregation, and layer). - In the RSIG3D Data tab, choose
Model->cmaq->read->file1to indicate that you want to import data from a standalone CMAQ file. - Select the Get Data button.
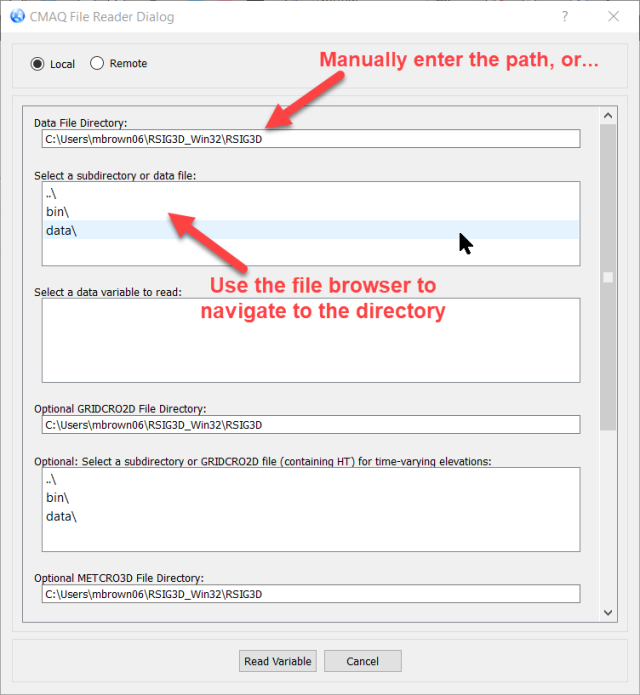
The following dialog box should display:

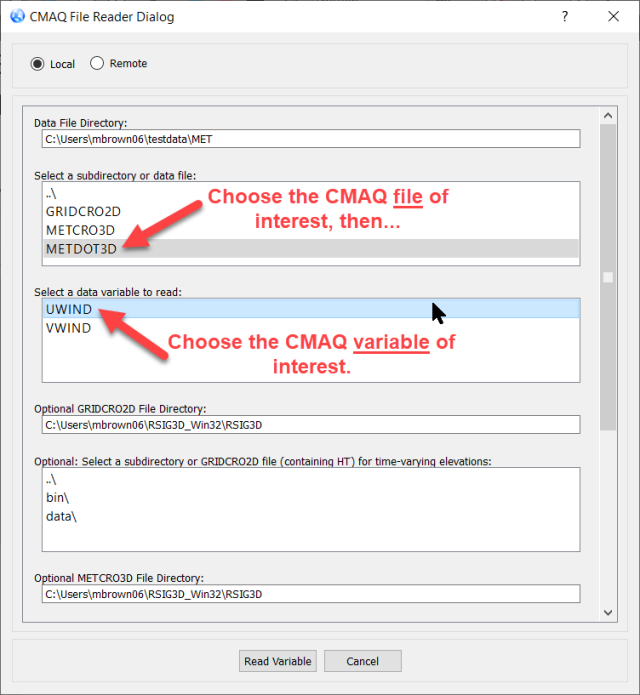
Once you navigate to the proper directory, RSIG3D will display a list of valid CMAQ files. To reduce visual clutter, only valid CMAQ files are listed. You can select the file and variable of your choice:

At this point you can select Read variable at the bottom of the dialog box and RSIG3D will read in the data. After that, the variable is treated the same as any other CMAQ variable in RSIG3D.
Time-Varying Elevations
For time-varying elevations, you can optionally specify:
- GRIDCRO2D (for variable HT)
- METCRO3D (for time-varying ZH)
Specification of GRIDCRO2D and METCRO3D are optional. If they are not specified, the ELEVATION will be static and approximated with HT=0 and based on EQUATES grid sigma pressures.
3D Wind
For loading CMAQ 3D Wind choose the following:
- Data file subdirectory: testdata/MET/METDOT3D
Data variable: UWIND - Optional GRIDCRO2D file directory: testdata/MET
Optional GRIDCRO2D file: GRIDCRO2D - Optional METCRO3D file directory: : testdata/MET
Optional METCRO3D file: METCRO3D - Optional METCRO3D/CONC file directory: testdata
Optional METCRO3D/CONC file: WWIND.ncf
Reading Remote CMAQ Files
To read CMAQ files on a remote system, you first need to set up proper ssh keys with an empty passphrase. This way RSIG3D running on your local system can access the remote system without prompting you for a password. This is a necessary step, but only needs to be done once. If you are an EPA user accessing an internal system such as Atmos, you must also have your EPA VPN connected.
- On your local machine, bring up a terminal window.
- Navigate to your “.ssh” directory. If it does not exist, you must first create it under your home directory ( e.g.,
mkdir .ssh). - Once you are in your .ssh directory, generate a new public/private key pair by typing:
ssh-keygen -t rsa - Choose a base name for the new public/private key pair, or accept the default (
id_rsa). - Select the Enter key when prompted for a passphrase.
- Select the Enter key again to confirm the empty passphrase. This will create two files, a private key (
id_rsa) and a public key (id_rsa.pub). - Add the public key (
id_rsa.pub) to the “authorized_keys” file on the remote machine.
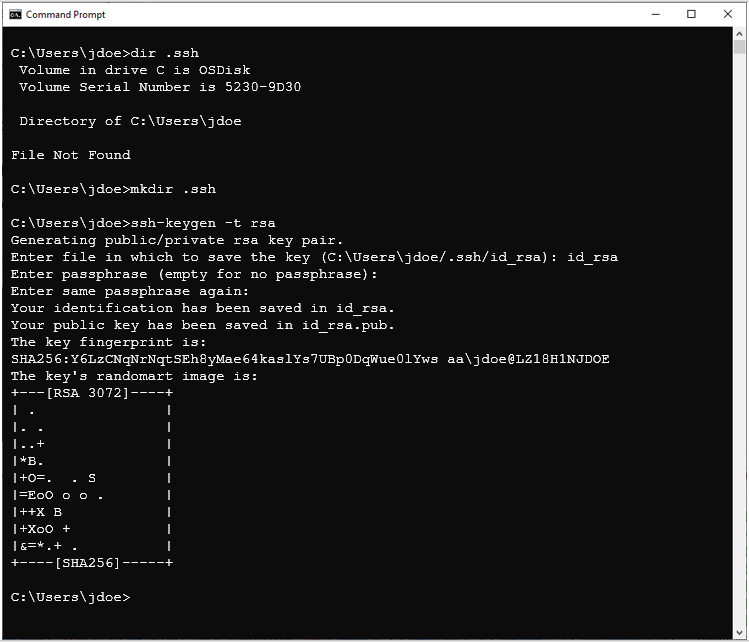
The following screenshot of a terminal window from an EPA Windows laptop illustrates the above process:

The public key (id_rsa.pub) should be copied to the remote system and appended to the authorized_keys file on the remote machine. For EPA users of Atmos, the authorized_keys file should already exist in in the user’s .ssh directory (~/.ssh/authorized_keys).
Once the ssh keys are working correctly, you can try switching to the remote option in the RSIG3D dialog.
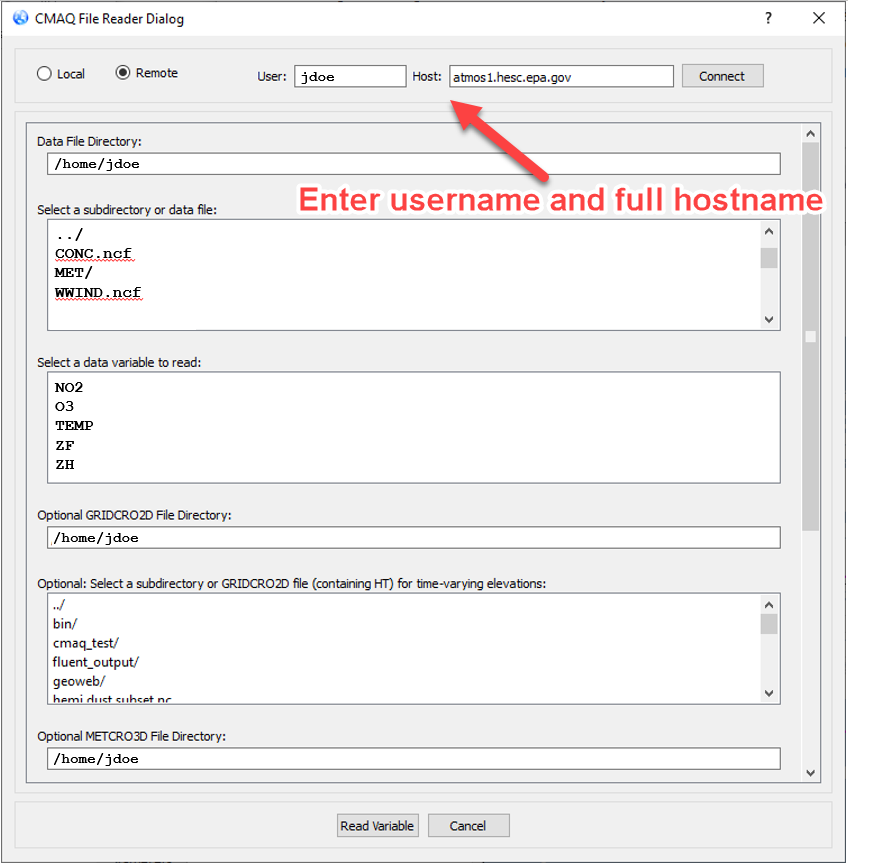
- Enter your username in the User field (e.g., jdoe) and the full hostname in the Host field (e.g., atmos1.hesc.epa.gov).
- Select the Connect button.
In a few seconds you should see the directory listing for your remote home directory in the "Select a subdirectory or data file" field. This indicates that the remote file reading capability is working. After that, you can proceed with selecting a data file and variable as described above for reading a local file.

